
How to find north without a compass: choose a method
In sunshine, a stick’s moving shadow can give you a rough east–west line. At night north of the equator, Polaris marks approximately true north. A watch and the sun offer another rough check in temperate latitudes. Choose a method you can check against the terrain.
If you are lost, stop before trying a direction trick. Check your last certain location and the terrain first. Retrace only when you recognize a safe way back; a guess that the parking lot is “somewhere north” is not enough to navigate by.
If you cannot safely retrace, seek help and stay put. In the US, call 911 when you need emergency help and can connect. Share your location and follow the dispatcher’s instructions. While waiting for rescue, move only for an immediate threat to life.
This follows the National Park Service outdoor emergency plan. Do your sky observations from a safe position; stepping onto an exposed ridge just to see a star adds a new hazard.
Can you find true north or magnetic north?
Sun and star methods estimate geographic, or true, directions. A magnetic needle points toward magnetic north, which can differ from true north. To find true north on a map, identify its meridians or stated north reference. A printed grid can use a third reference, grid north.
These differences matter when you transfer an observation to paper. Our map and compass guide explains bearings and declination. Finding magnetic north specifically requires magnetic information; Polaris does not supply a local declination value.
Use a shadow stick during the day
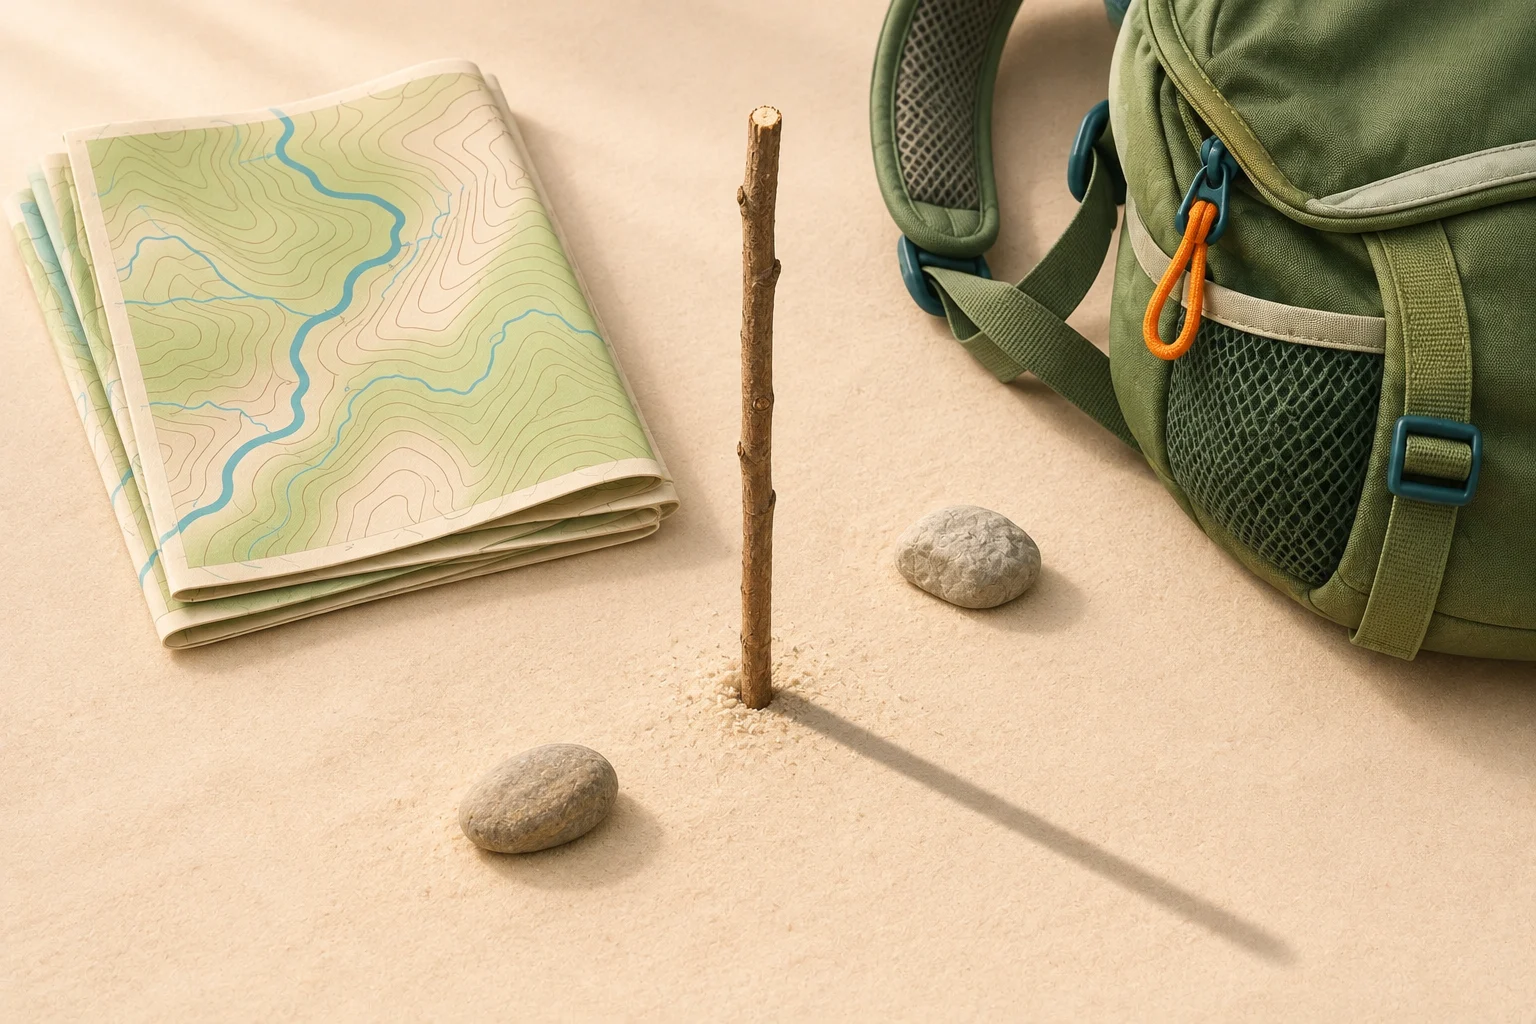
The shadow stick method needs direct sunlight, a clear shadow tip and a flat patch of ground. Push a straight stick upright so it stays still. Its height matters less than being able to mark the tip clearly. Leave rooted plants alone and follow local rules about disturbing the ground.
Mark the first shadow tip. Use a small loose stone or another removable marker. Keep the stick fixed.
Wait for a visible change. Be Ready Utah suggests 15–30 minutes. Mark the new tip without moving the stick.
Join the two marks. From the first mark toward the second is approximately west to east in the usual nonpolar setup.
Face across the line toward north. With west at your left and east at your right, north is ahead, perpendicular to the line. Check this against another reference.
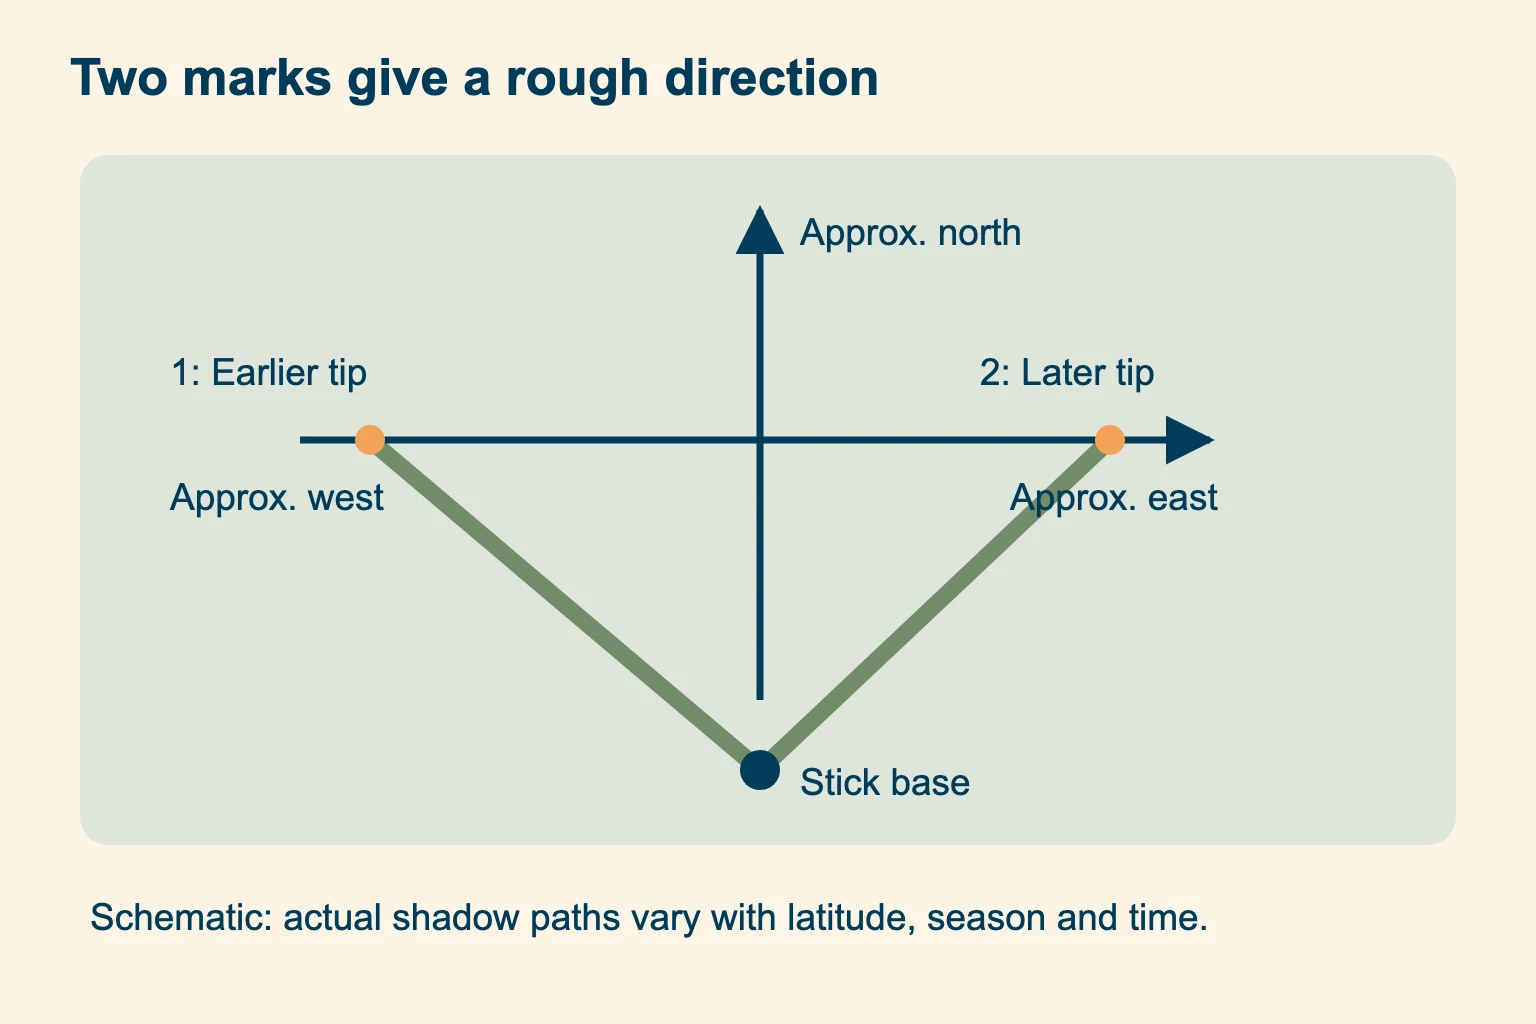
Be Ready Utah demonstrates the two-mark method. Use it as a broad check. A short segment of a shadow’s curved daily path is not guaranteed to align exactly east–west; errors vary with season, latitude and time of day.
A sloping surface, a leaning stick or a fuzzy tip makes the result harder to interpret. If the two marks disagree with a clearly identified map landmark, stop and investigate. Taking more marks can reveal a curve, but it does not turn an arbitrary short segment into a precise bearing.
The equal-shadow method: match morning and afternoon lengths
If you have a safe place and several hours, the equal-shadow method improves the geometry by pairing shadows of the same length on either side of solar noon. It requires a vertical stick on level ground. Two marks made at arbitrary times do not meet that condition.
Start while the morning shadow is shortening. Mark its tip. Using a cord from the stick’s base, trace an arc through that mark, keeping the radius fixed.
Leave the setup undisturbed. The shadow tip moves inside the arc as noon approaches. Later, the lengthening afternoon shadow reaches the arc again.
Mark that second crossing. Join the morning and afternoon marks for an approximate east–west line. First toward second is west toward east.
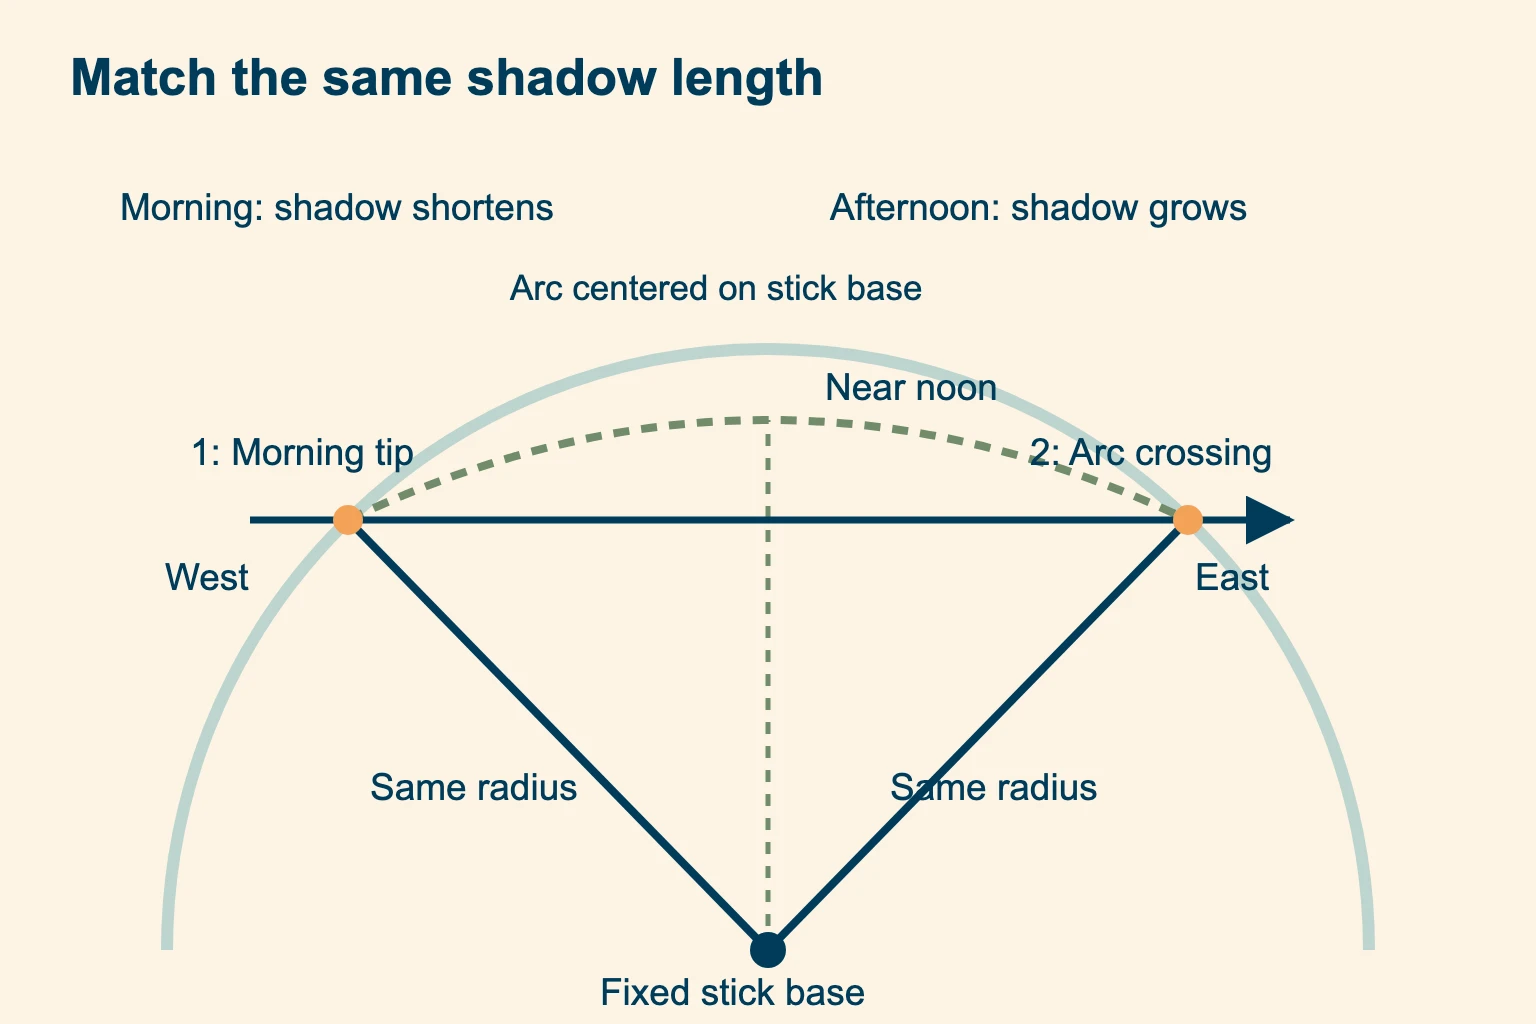
The Army’s survival manual, section 7-25, describes this construction. It remains a field estimate: marking errors, uneven ground and the sun’s changing seasonal position limit precision. Neither shadow method should be treated as a universal solution in polar conditions.
Waiting for an arc crossing is a practice exercise or a deliberate stationary observation. Do not postpone shelter, essential care or a call for help to finish it.
Find north with the sun: noon, sunrise and sunset
Across most of the contiguous US, the sun is south at local solar noon, and a vertical stick’s shadow points north. Solar noon is when the sun crosses your local meridian. It often differs from 12:00 on a watch because of longitude, season and daylight saving time.
Do not apply that noon rule everywhere in the Northern Hemisphere. Within the tropics, including much of Hawaii, the midday sun can be north or south depending on the date, or nearly overhead. South of the tropics, the noon sun is north. The US Naval Observatory explains solar and civil time.
Sunrise and sunset give broad eastern and western cues where the sun rises and sets. The precise horizon points change through the year and with latitude; mountains can also hide the actual rise or set. Treat “the sun rises due east” as an equinox approximation for an unobstructed horizon. Do not rely on it for a precise bearing on an ordinary day. Never stare at the sun to line up a reading.
How to find north with a watch
The analog watch method is a rough shortcut for temperate latitudes. Use local standard time: if daylight saving time is in effect, subtract the extra hour first. Setting the watch to GMT would be wrong unless that is your local standard time.
In the northern temperate zone, hold the dial level and point the hour hand horizontally toward the sun’s direction. Bisect the smaller angle between the hour hand and 12. During ordinary daylight hours, that bisector indicates approximately south; north is opposite.
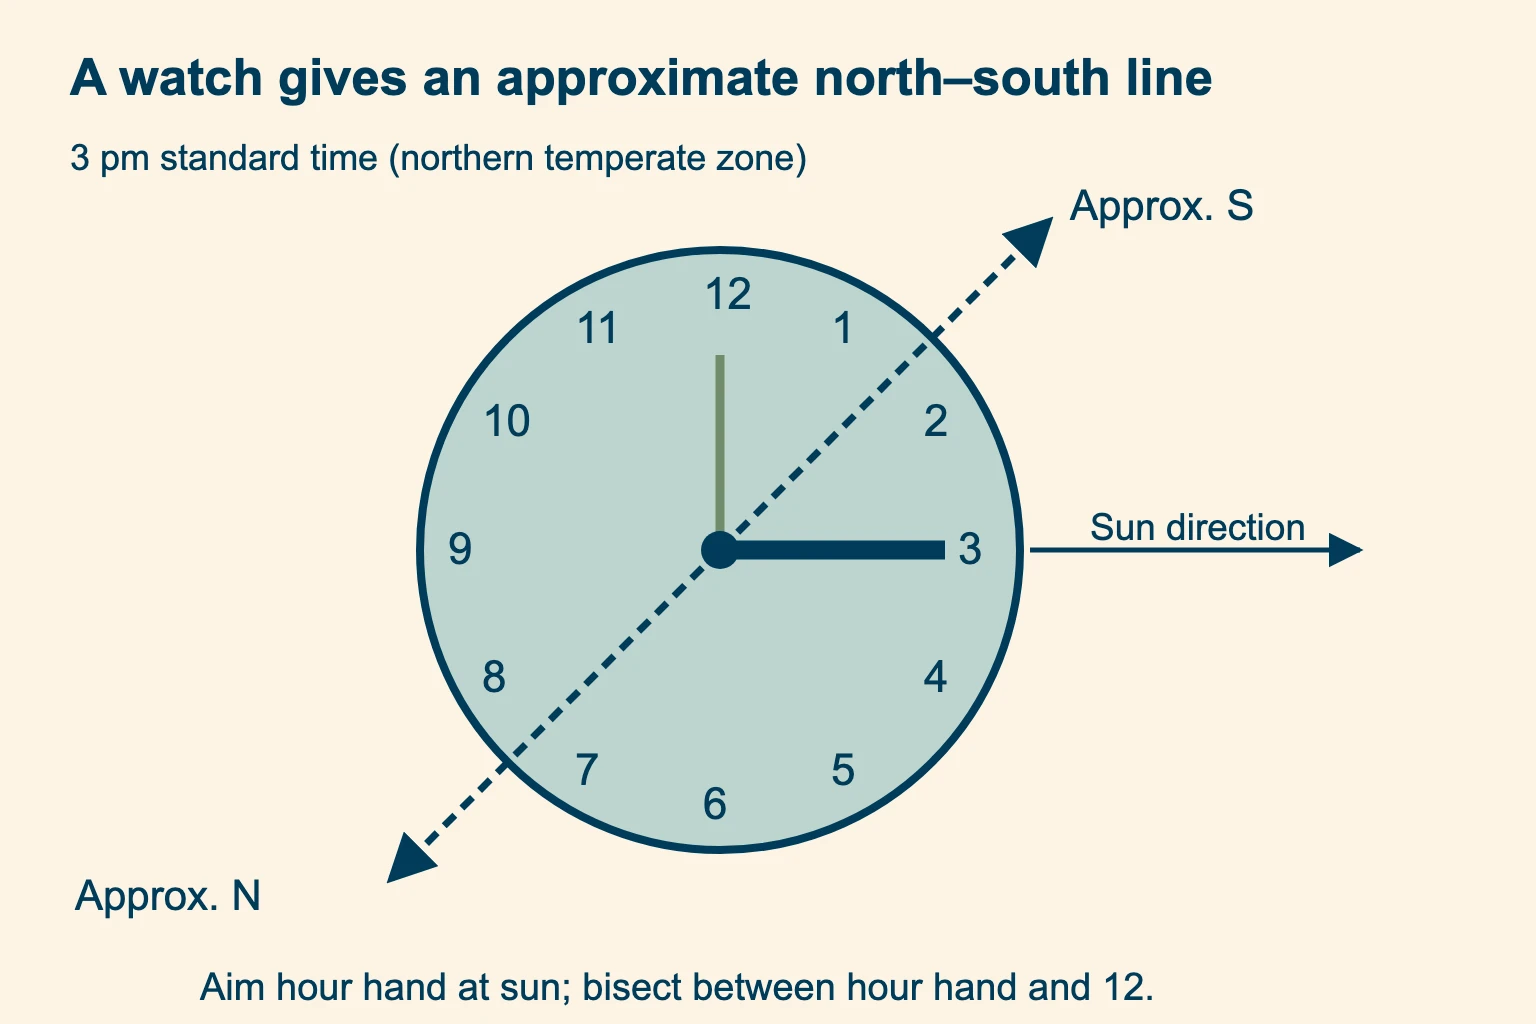
Use the hour hand. The thin minute hand shows minutes; it is not the hand to point toward the sun.
Treat the result cautiously. Time-zone offsets and the sun’s seasonal path can produce a substantial error.
For example, at 3 pm standard time, the bisector lies halfway between 12 and 3, at the dial’s 1:30 direction. The watch still reads 3 pm. The 1:30 position only labels a direction on its face. At 4 pm daylight time, correct to 3 pm standard time before using this example.
In the southern temperate zone, aim 12 toward the sun instead. The bisector between 12 and the hour hand then gives approximate north. Skip this shortcut near the equator or when you cannot tell which half of the line makes sense. A known time can be sketched as a dial on paper; an analog wristwatch is not essential.
The Royal Geographical Society expedition handbook discusses improvised navigation and its limits. Practice the watch shortcut against a reliable reference before a trip. Do not steer a long walk by it.
How to find the North Star with the Big Dipper
Polaris, the North Star, lies close to the north celestial pole. It provides a true-north reference when visible from the Northern Hemisphere. It is not the brightest star in the sky, so choosing whichever star looks brightest will fail.
Find the Big Dipper’s bowl. Look for four stars forming a bowl with a three-star handle. The pattern can be tilted or upside down.
Use the outer two bowl stars. Trace from Merak through Dubhe, away from the bowl’s bottom, and continue about five times their separation beyond Dubhe.
Identify Polaris, then project down. Polaris is at the end of the Little Dipper’s handle. Drop an imaginary vertical line to the horizon for approximately true north.
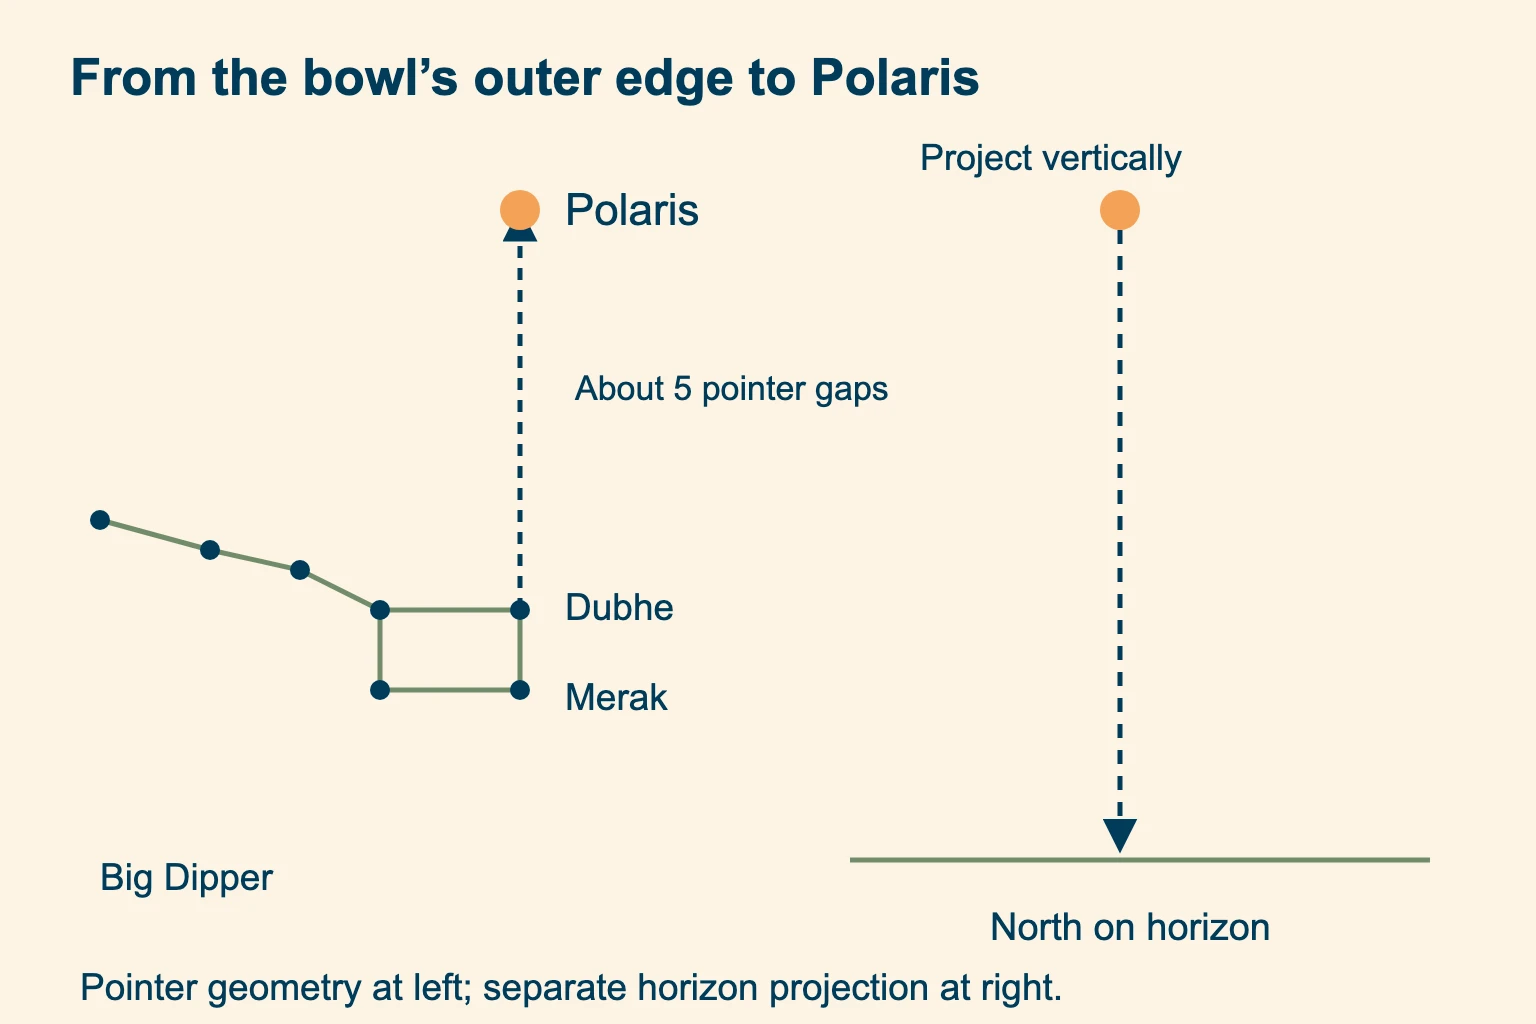
NASA’s Polaris guide illustrates the pointer stars. The star’s height above a level horizon roughly matches your northern latitude. Near the equator it is very low, making terrain, haze and trees a serious obstacle. At the North Pole it is nearly overhead, where the simple horizon projection is unsuitable.
Cassiopeia, the Little Dipper and Orion
If the Big Dipper is hidden, a known star chart can help you find Polaris from Cassiopeia’s W-shaped pattern on the other side of the pole. The British Astronomical Association shows their relationship. Learn the chart before your hike; a W alone is not enough to identify the pole star confidently.
The Little Dipper supplies a useful confirmation: Polaris ends its handle. Several other stars in that pattern are faint, so you may see Polaris while failing to see the entire dipper.
Orion’s Belt is not a pointer directly to Polaris. A full sky chart can guide a longer star hop, but Orion is a poor starting point for this task. Use the Big Dipper or a learned Cassiopeia chart instead. When neither the chart nor the star identification is convincing, leave the direction unresolved.
Find north in the Southern Hemisphere
Polaris is generally below the horizon in the Southern Hemisphere. Instead, an identified Southern Cross can help you estimate south, then face the opposite direction for north. You need the actual Crux pattern; the nearby False Cross can lead you astray.
Follow the long axis from Gacrux through Acrux. Extend it about four and a half times that star-to-star length beyond Acrux to estimate the south celestial pole. The estimated pole is usually in empty sky; there is no bright star conveniently marking it. Project vertically down to the horizon for south.
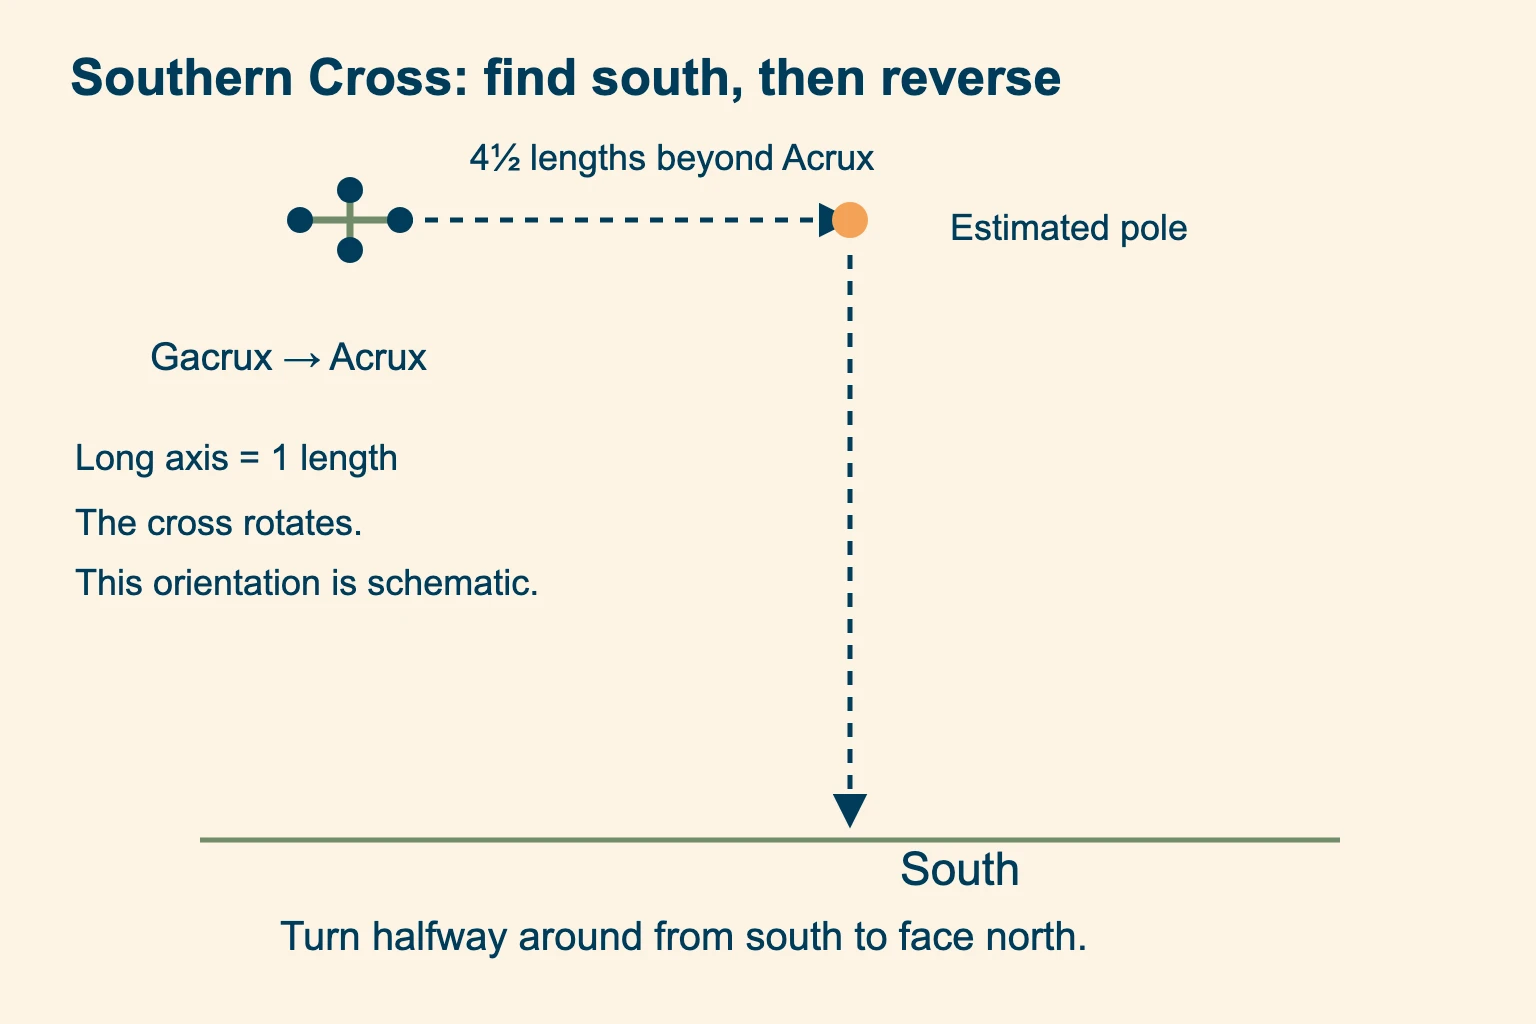
Find south first. Turn halfway around to face north only after you have established the southern reference.
Check identification. Use a trusted sky chart to distinguish Crux and its nearby pointer stars from other crosses.
The Western Australian astronomical almanac, page 118, explains this estimate. Visibility depends on latitude and time; do not assume Crux is visible every night from every southern location. By day, the noon-sun rule reverses south of the tropics, while tropical locations still need the date-dependent qualification.
Use a phone or Google Maps when the sky is hidden
A phone may have a compass sensor even when you have no separate compass. Check the actual app and its north reference; nearby metal or magnets can disturb its heading. A map’s north-up display is different from the direction your phone is physically pointing.
In Google Maps, the red end of the compass indicates north. Use the compass control to request a north-up view, then check that the red end points toward the top; controls can vary by app version. That orients the screen. Google’s compass-calibration help covers a misleading heading display. A north-up view does not prove that the top of a phone lying on a rock points north on the ground. Identify a mapped road or other unmistakable feature to relate screen and terrain.
Cloud and dense trees may remove every usable sun or star cue. If your phone still has a position fix and previously downloaded mapping, use them to assess your location. Read our GPS for hiking guide for the difference between satellite positioning, map downloads and cell service.
How to navigate without a compass in the woods
A direction becomes useful only when tied to your location and a known destination. Start with a confidently identified trail junction or landmark on your map. Compare the trail’s shape with nearby terrain; several lookalike ridges are a reason to pause.
Suppose you know a signed junction is south of your present, positively identified position along the same trail. A north estimate can help check which branch agrees with that relationship. It cannot establish that the branch reaches the junction, avoids a cliff or remains passable.
Match several terrain features before moving, and keep checking as you go. Our topographic map guide explains contours and terrain matching. If you cannot identify a safe return, use the emergency plan near the start of this article.
Does moss grow on the north side of trees?
Moss grows where moisture and shade suit it, including several sides of the same tree. The University of Maryland Extension explicitly rejects the claim that it grows only on the north side. Neighboring trees can shade a trunk from directions unrelated to north.
Wind exposure can influence tree growth, and shade can preserve snow on a slope. Neither observation supplies a dependable direction on its own. Likewise, a stream flowing downhill does not establish a safe route to a road. Practice natural navigation while your position is known, with a map and compass available to check the result.
How to find north without a compass: common questions
What can I use if I don’t have a compass?
In direct sun, use a fixed upright stick and marked shadow tips for an approximate direction. At night in the Northern Hemisphere, use positively identified Polaris. A working phone with a compass or downloaded mapping may also provide a reference. Check your position before choosing a route.
How do you find north without a compass at night?
Locate Polaris using the Big Dipper’s outer bowl stars, then project vertically to the horizon. This works only where Polaris is visible in the Northern Hemisphere. In the Southern Hemisphere, an identified Southern Cross provides an estimate of south. Cloud or a blocked horizon can prevent either method.
How can you navigate without GPS?
A paper topographic map, compass and practiced terrain matching allow navigation without a satellite fix. Without a compass as well, sky observations can help orient the map approximately, but you still need a confidently known position and a safe route. An estimated north direction alone cannot locate you.
Can my phone be used as a compass?
Many phones have a magnetic heading sensor and a compass app. Check your device, its calibration prompts and whether it displays true or magnetic north. Keep it away from magnetic cases and metal objects. A north-up map view alone cannot establish the phone’s physical heading.
Can you find north without a compass or phone on a cloudy day?
Only if you have another reliable reference, such as a confidently identified mapped feature. Without a usable sky view or known landmark, there may be no trustworthy way to determine north. Do not guess from moss or start wandering; assess shelter, communications and a safe known return.
Is the North Star always visible?
No. Polaris is generally visible above the horizon in the Northern Hemisphere when the sky and sight line are clear, but trees, mountains, haze and cloud can hide it. It sits very low near the equator and generally below the horizon south of it. It is also too faint to use in ordinary daylight.
Learn the map skills behind the direction A rough north reference is more useful when you can recognize your position on the map.